


📢 转载信息
原文链接:https://www.kdnuggets.com/7-steps-to-build-a-simple-rag-system-from-scratch
原文作者:Kanwal Mehreen
# 引言
如今,几乎每个人都在使用ChatGPT、Gemini或其他大型语言模型(LLM)。它们让生活更轻松,但有时仍然会出错。例如,我记得问一个生成式模型谁赢得了最近的美国总统选举,结果得到了前一任总统的名字。模型听起来很自信,但它只是依赖于选举发生之前的训练数据。这就是检索增强生成(RAG)发挥作用的地方,它可以帮助LLM提供更准确和最新的回复。RAG系统不是仅仅依赖模型的内部知识,而是从外部源——例如PDF、文档或API——中提取信息,并利用这些信息构建更具上下文性和可靠性的答案。在本指南中,我将引导你完成从零开始构建一个简单RAG系统的七个实用步骤。
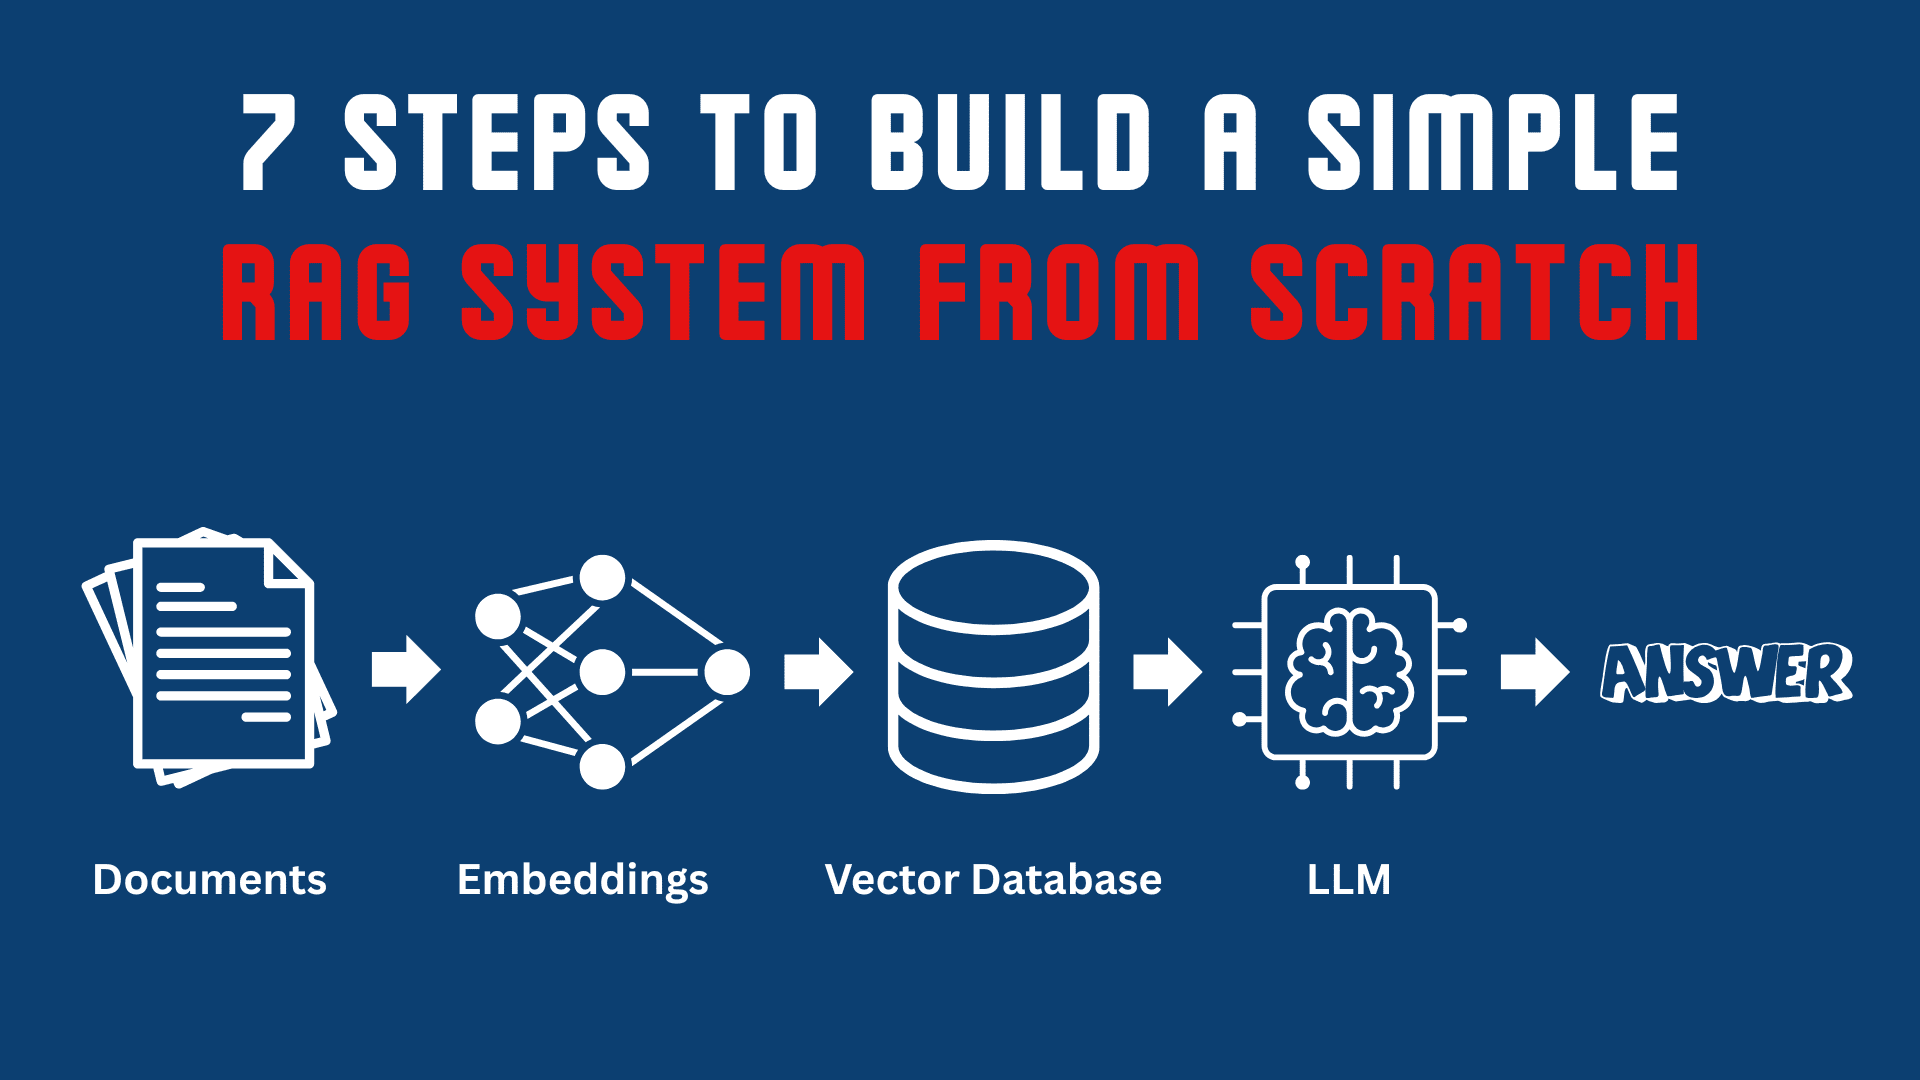
# 理解检索增强生成的工作流程
在进入代码之前,我们先用通俗的语言来理解这个概念。RAG系统有两个核心组件:检索器(retriever)和生成器(generator)。检索器搜索你的知识库,并提取最相关的文本块。生成器是语言模型,它接收这些片段并将其转化为自然、有用的答案。这个过程如下所示:
- 用户提出问题。
- 检索器搜索已索引的文档或数据库,返回最佳匹配的段落。
- 这些段落作为上下文被提供给LLM。
- 然后LLM根据检索到的上下文生成回复。
现在我们将这个流程分解为七个简单的步骤,并端到端地构建它。
# 步骤 1:数据预处理
尽管大型语言模型从教科书和网络数据中学到了很多知识,但它们无法获取你的私有或新生成的信息,例如研究笔记、公司文档或项目文件。RAG可以帮助你向模型输入自己的数据,从而减少幻觉(hallucinations),并使回复更准确、更及时。为了本文的简便起见,我们将使用几份关于机器学习概念的简短文本文档。
data/ ├── supervised_learning.txt └── unsupervised_learning.txt
supervised_learning.txt: In this type of machine learning (supervised), the model is trained on labeled data. In simple terms, every training example has an input and an associated output label. The objective is to build a model that generalizes well on unseen data. Common algorithms include: - Linear Regression - Decision Trees - Random Forests - Support Vector Machines Classification and regression tasks are performed in supervised machine learning. For example: spam detection (classification) and house price prediction (regression). They can be evaluated using accuracy, F1-score, precision, recall, or mean squared error.
unsupervised_learning.txt: In this type of machine learning (unsupervised), the model is trained on unlabeled data. Popular algorithms include: - K-Means - Principal Component Analysis (PCA) - Autoencoders There are no predefined output labels; the algorithm automatically detects underlying patterns or structures within the data. Typical use cases include anomaly detection, customer clustering, and dimensionality reduction. Performance can be measured qualitatively or with metrics such as silhouette score and reconstruction error.
接下来的任务是加载这些数据。为此,我们将创建一个 Python 文件,命名为 load_data.py:
import os def load_documents(folder_path): docs = [] for file in os.listdir(folder_path): if file.endswith(".txt"): with open(os.path.join(folder_path, file), 'r', encoding='utf-8') as f: docs.append(f.read()) return docs
在使用数据之前,我们需要清理它。如果文本混乱,模型可能会检索到不相关或不正确的段落,从而增加幻觉的可能性。现在,让我们创建另一个 Python 文件,命名为 clean_data.py:
import re def clean_text(text: str) -> str: text = re.sub(r'\s+', ' ', text) text = re.sub(r'[^\x00-\x7F]+', ' ', text) return text.strip()
最后,将所有内容合并到一个名为 prepare_data.py 的新文件中,用于一起加载和清理文档:
from load_data import load_documents from clean_data import clean_text def prepare_docs(folder_path="data/"): """ Loads and cleans all text documents from the given folder. """ # Load Documents raw_docs = load_documents(folder_path) # Clean Documents cleaned_docs = [clean_text(doc) for doc in raw_docs] print(f"Prepared {len(cleaned_docs)} documents.") return cleaned_docs
# 步骤 2:将文本转换为块(Chunks)
LLM拥有很小的上下文窗口(context window)——例如,它们一次只能处理有限量的文本。我们通过将长文档分割成简短、重叠的片段来解决这个问题(一个块中的词数通常在300到500个)。我们将使用LangChain的 RecursiveCharacterTextSplitter,它在句子或段落等自然断点处分割文本。每个片段都具有意义,模型在回答时可以快速找到相关的片段。
split_text.py from langchain.text_splitter import RecursiveCharacterTextSplitter def split_docs(documents, chunk_size=500, chunk_overlap=100): # define the splitter splitter = RecursiveCharacterTextSplitter( chunk_size=chunk_size, chunk_overlap=chunk_overlap ) # use the splitter to split docs into chunks chunks = splitter.create_documents(documents) print(f"Total chunks created: {len(chunks)}") return chunks
分块处理有助于模型理解文本而不会丢失其含义。如果我们不在片段之间添加一点重叠,模型在边缘处可能会感到困惑,导致答案不连贯。
# 步骤 3:创建和存储向量嵌入
计算机不理解文本信息;它只理解数字。因此,我们需要将文本块转换为数字。这些数字被称为向量嵌入(vector embeddings),它们有助于计算机理解文本背后的含义。我们可以使用OpenAI、SentenceTransformers或Hugging Face等工具来实现这一点。让我们创建一个名为 create_embeddings.py 的新文件,并使用SentenceTransformers来生成嵌入:
from sentence_transformers import SentenceTransformer import numpy as np def get_embeddings(text_chunks): # Load embedding model model = SentenceTransformer('sentence-transformers/all-MiniLM-L6-v2') print(f"Creating embeddings for {len(text_chunks)} chunks:") embeddings = model.encode(text_chunks, show_progress_bar=True) print(f"Embeddings shape: {embeddings.shape}") return np.array(embeddings)
每个向量嵌入都捕获了其语义含义。相似的文本块在向量空间中的嵌入彼此靠近。现在我们将嵌入存储在向量数据库中,如FAISS(Facebook AI Similarity Search)、Chroma或Pinecone。这有助于快速进行相似性搜索。例如,我们使用FAISS(一个轻量级的本地选项)。你可以通过以下方式安装它:
pip install faiss-cpu
接下来,让我们创建一个名为 store_faiss.py 的文件。首先,我们进行必要的导入:
import faiss import numpy as np import pickle
现在,我们使用 build_faiss_index() 函数从嵌入中创建一个FAISS索引。
def build_faiss_index(embeddings, save_path="faiss_index"): """ Builds FAISS index and saves it. """ dim = embeddings.shape[1] print(f"Building FAISS index with dimension: {dim}") # Use a simple flat L2 index index = faiss.IndexFlatL2(dim) index.add(embeddings.astype('float32')) # Save FAISS index faiss.write_index(index, f"{save_path}.index") print(f"Saved FAISS index to {save_path}.index") return index
每个嵌入代表一个文本块,FAISS有助于在将来用户提出问题时检索最近的嵌入。最后,我们需要将所有文本块(及其元数据)保存到一个pickle文件中,以便稍后可以轻松重新加载进行检索。
def save_metadata(text_chunks, path="faiss_metadata.pkl"): """ Saves the mapping of vector positions to text chunks. """ with open(path, "wb") as f: pickle.dump(text_chunks, f) print(f"Saved text metadata to {path}")
# 步骤 4:检索相关信息
在此步骤中,用户的查询首先被转换为数字形式,就像我们之前对所有文本块所做的那样。然后计算机将文本块的数值与查询的向量进行比较,以找到最接近的文本块。这个过程被称为相似性搜索(similarity search)。
让我们创建一个名为 retrieve_faiss.py 的新文件并进行所需的导入:
import faiss import pickle import numpy as np from sentence_transformers import SentenceTransformer
现在,创建一个函数,用于从磁盘加载先前保存的FAISS索引,以便可以对其进行搜索。
def load_faiss_index(index_path="faiss_index.index"): """ Loads the saved FAISS index from disk. """ print("Loading FAISS index.") return faiss.read_index(index_path)
我们还需要另一个函数来加载元数据,其中包含我们之前存储的文本块。
def load_metadata(metadata_path="faiss_metadata.pkl"): """ Loads text chunk metadata (the actual text pieces). """ print("Loading text metadata.") with open(metadata_path, "rb") as f: return pickle.load(f)
原始文本块存储在元数据文件(faiss_metadata.pkl)中,用于将FAISS结果映射回可读文本。此时,我们将创建另一个函数,它接收用户的查询、对其进行嵌入处理,并从FAISS索引中找到最匹配的块。语义搜索就在这里发生。
def retrieve_similar_chunks(query, index, text_chunks, top_k=3): """ Retrieves top_k most relevant chunks for a given query. Parameters: query (str): The user's input question. index (faiss.Index): FAISS index object. text_chunks (list): Original text chunks. top_k (int): Number of top results to return. Returns: list: Top matching text chunks. """ # Embed the query model = SentenceTransformer('sentence-transformers/all-MiniLM-L6-v2') # Ensure query vector is float32 as required by FAISS query_vector = model.encode([query]).astype('float32') # Search FAISS for nearest vectors distances, indices = index.search(query_vector, top_k) print(f"Retrieved top {top_k} similar chunks.") return [text_chunks[i] for i in indices[0]]
这会给出最相关的三个文本块,用作上下文。
# 步骤 5:组合检索到的上下文
一旦我们获得了最相关的块,下一步就是将它们组合成一个单一的上下文块。然后,这个上下文会被附加到用户的查询之前,一起传递给LLM。这一步确保了模型拥有生成准确、有根据的回复所需的所有必要信息。你可以这样组合这些块:
context_chunks = retrieve_similar_chunks(query, index, text_chunks, top_k=3) context = "\n\n".join(context_chunks)
这个合并后的上下文将在稍后用于构建LLM的最终提示(prompt)。
# 步骤 6:使用大型语言模型生成答案
现在,我们将检索到的上下文与用户查询相结合,并将其输入到LLM中以生成最终答案。在这里,我们将使用Hugging Face上一个可免费使用的开源模型,但你可以使用任何你喜欢的模型。
让我们创建一个名为 generate_answer.py 的新文件并添加导入:
from transformers import AutoTokenizer, AutoModelForCausalLM import torch from retrieve_faiss import load_faiss_index, load_metadata, retrieve_similar_chunks
现在定义一个 generate_answer() 函数来执行整个过程:
def generate_answer(query, top_k=3): """ Retrieves relevant chunks and generates a final answer. """ # Load FAISS index and metadata index = load_faiss_index() text_chunks = load_metadata() # Retrieve top relevant chunks context_chunks = retrieve_similar_chunks(query, index, text_chunks, top_k=top_k) context = "\n\n".join(context_chunks) # Load open-source LLM print("Loading LLM...") model_name = "TinyLlama/TinyLlama-1.1B-Chat-v1.0" # Load tokenizer and model, using a device map for efficient loading tokenizer = AutoTokenizer.from_pretrained(model_name) model = AutoModelForCausalLM.from_pretrained(model_name, torch_dtype=torch.float16, device_map="auto") # Build the prompt prompt = f""" Context: {context} Question: {query} Answer: """ # Generate output inputs = tokenizer(prompt, return_tensors="pt").to(model.device) with torch.no_grad(): outputs = model.generate(**inputs, max_new_tokens=200, pad_token_id=tokenizer.eos_token_id) # Decode and clean up the answer, removing the original prompt full_text = tokenizer.decode(outputs[0], skip_special_tokens=True) # Simple way to remove the prompt part from the output answer = full_text.split("Answer:")[1].strip() if "Answer:" in full_text else full_text.strip() print("\nFinal Answer:") print(answer)
# 步骤 7:运行完整的检索增强生成管道
最后一步是将所有内容整合起来。我们将创建一个 main.py 文件,该文件将自动化整个工作流程,从数据加载到生成最终答案。
# Data preparation from prepare_data import prepare_docs from split_text import split_docs # Embedding and storage from create_embeddings import get_embeddings from store_faiss import build_faiss_index, save_metadata # Retrieval and answer generation from generate_answer import generate_answer
现在定义主函数:
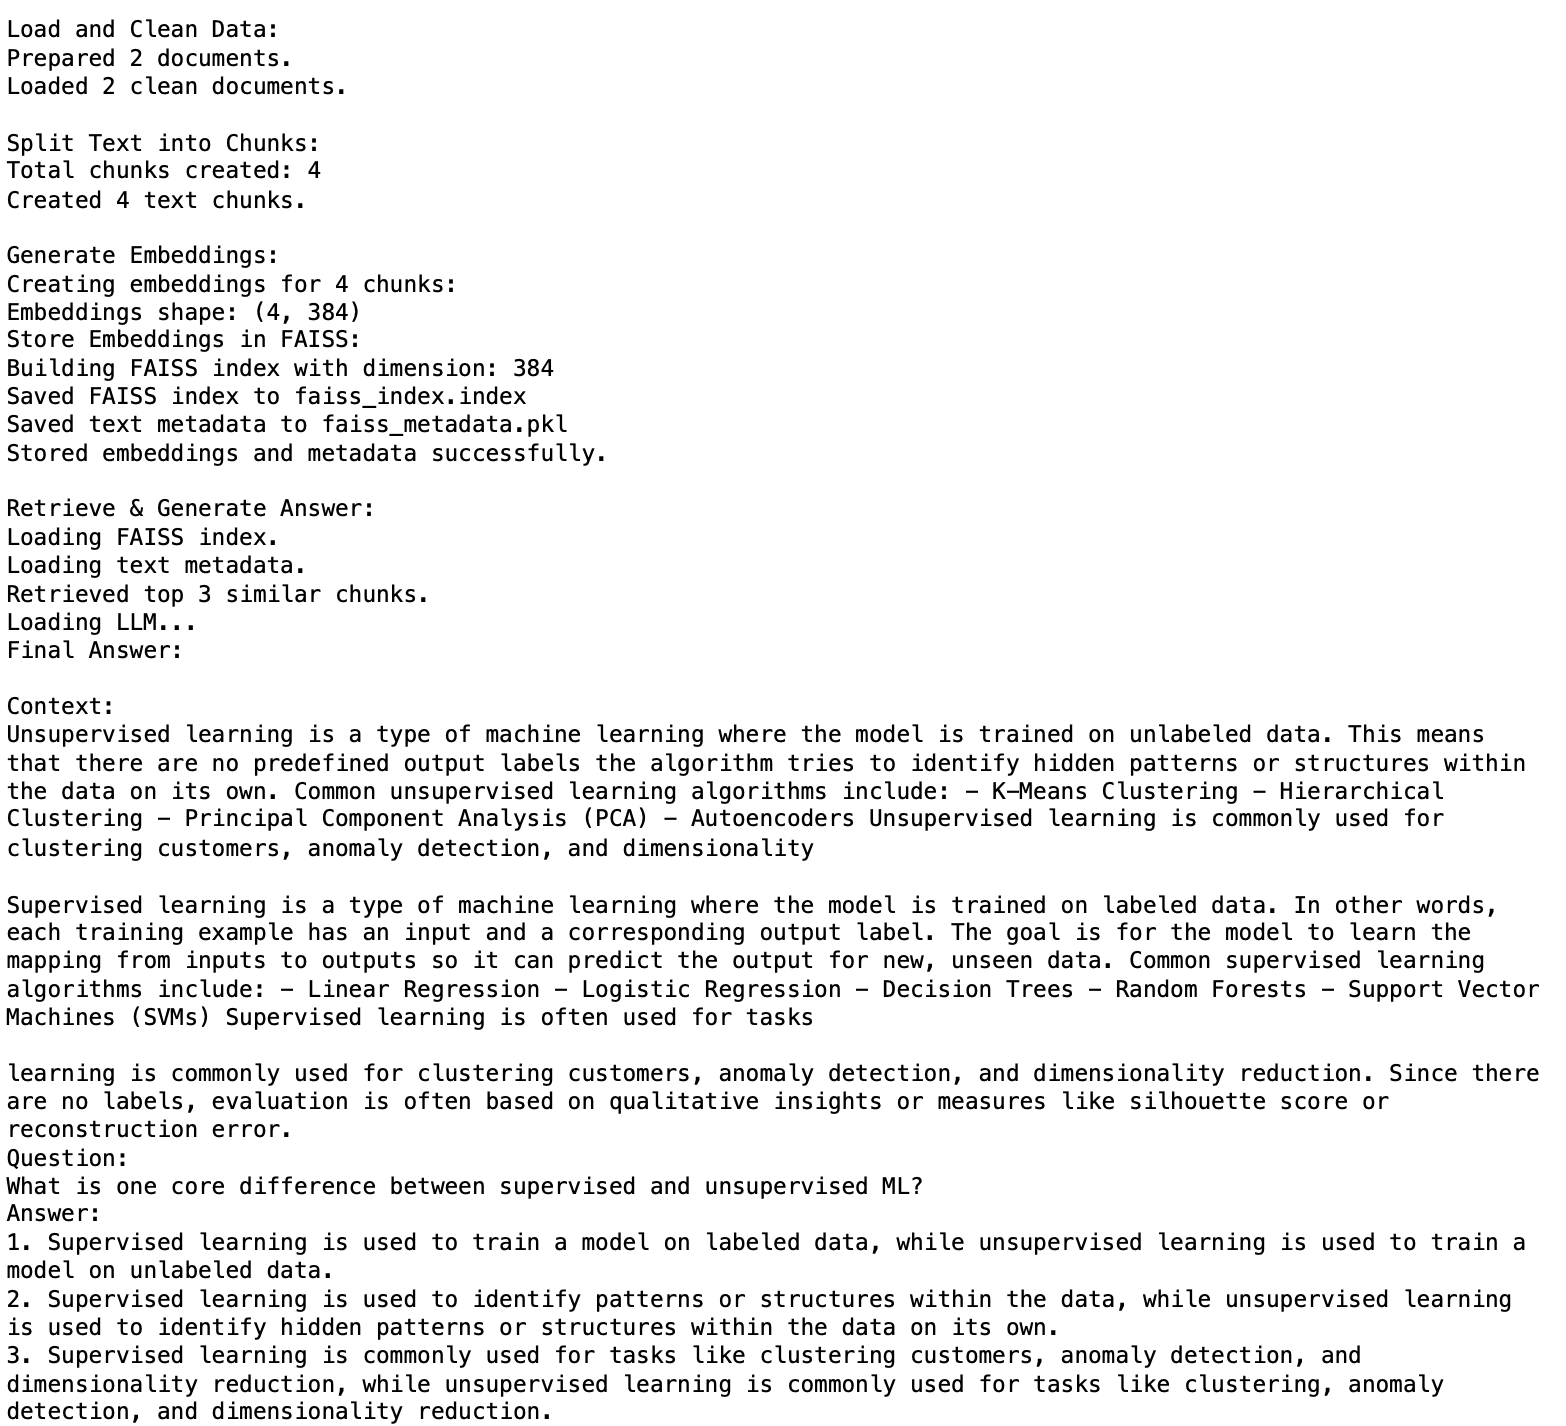
def run_pipeline(): """ Runs the full end-to-end RAG workflow. """ print("\nLoad and Clean Data:") documents = prepare_docs("data/") print(f"Loaded {len(documents)} clean documents.\n") print("Split Text into Chunks:") # documents is a list of strings, but split_docs expects a list of documents # For this simple example where documents are small, we pass them as strings chunks_as_text = split_docs(documents, chunk_size=500, chunk_overlap=100) # In this case, chunks_as_text is a list of LangChain Document objects # Extract text content from LangChain Document objects texts = [c.page_content for c in chunks_as_text] print(f"Created {len(texts)} text chunks.\n") print("Generate Embeddings:") embeddings = get_embeddings(texts) print("Store Embeddings in FAISS:") index = build_faiss_index(embeddings) save_metadata(texts) print("Stored embeddings and metadata successfully.\n") print("Retrieve & Generate Answer:") query = "Does unsupervised ML cover regression tasks?" generate_answer(query)
最后,运行管道:
if __name__ == "__main__": run_pipeline()输出:
# 总结
RAG弥合了LLM“已知”信息与世界上不断变化的信息之间的差距。我实现了一个非常基础的管道,以便你能理解RAG的工作原理。在企业级应用中,通常会使用许多高级概念,例如添加护栏(guardrails)、混合搜索、流式传输和上下文优化技术。如果你有兴趣探索更高级的概念,这里有一些我个人最喜欢的资源:
Kanwal Mehreen 是一位机器学习工程师和技术作家,对数据科学以及人工智能与医学的交叉领域抱有深厚的热情。她合著了电子书《Maximizing Productivity with ChatGPT》。作为2022年亚太地区谷歌一代学者,她倡导多元化和学术卓越。她还获得了Teradata技术多元化学者、Mitacs全球连接研究学者和哈佛WeCode学者的认可。Kanwal是变革的坚定倡导者,她创立了FEMCodes,旨在赋能STEM领域的女性。
🚀 想要体验更好更全面的AI调用?
欢迎使用青云聚合API,约为官网价格的十分之一,支持300+全球最新模型,以及全球各种生图生视频模型,无需翻墙高速稳定,文档丰富,小白也可以简单操作。
评论区