


📢 转载信息
原文作者:Florent Gbelidji, Bruno Pistone, Louise Ping, and Safir Alvi
企业正越来越多地从单纯依赖大型通用语言模型(LLM)转向利用其专有数据对模型进行微调,以开发专业化的 LLM。尽管基础模型(FM)提供了令人印象深刻的通用能力,但在应用于企业环境的复杂性时,它们往往力不从心——在这些环境中,准确性、安全性、合规性和领域特定知识是不可或缺的。
为了满足这些需求,组织正在采用根据其内部数据和工作流程进行定制的、具有成本效益的模型。通过在专有文档和领域特定术语上进行微调,企业正在构建能够理解其独特上下文的模型——从而带来更相关的输出、更严格的数据治理以及跨内部工具的更简单部署。
此举也是一项战略举措,旨在降低运营成本、提高推理延迟,并对数据隐私保持更大的控制权。因此,企业正在将其 AI 战略重新定义为与业务需求保持一致的、定制化的、尺寸合适的模型。
为企业用例扩展 LLM 微调带来了真实的技术和操作障碍,这些障碍正通过 Hugging Face 和 Amazon SageMaker AI 之间强大的合作得到克服。
许多组织在采用像 低秩适应(LoRA)、QLoRA 和基于人类反馈的强化学习(RLHF)等先进微调技术时,面临着工具链零散和复杂性增加的问题。此外,大型模型训练的资源需求——包括内存限制和分布式基础设施挑战——往往会减缓创新速度并给内部团队带来压力。
为克服这一挑战,SageMaker AI 和 Hugging Face 联手简化并扩展了模型定制。通过将 Hugging Face Transformers 库集成到 SageMaker 的全托管基础设施中,企业现在可以:
- 开箱即用地运行分布式微调任务,内置支持参数高效调优方法
- 使用优化的计算和存储配置来降低训练成本并提高 GPU 利用率
- 通过在生产级环境中使用熟悉的开源库来加速价值实现时间
此协作帮助企业专注于构建领域特定、尺寸合适的 LLM,从而更快地释放 AI 价值,同时完全控制其数据和模型。
在本文中,我们将展示这种集成方法如何将企业 LLM 微调从一个复杂、资源密集型的挑战转变为一个简化、可扩展的解决方案,从而在特定领域的应用中实现更好的模型性能。我们使用 meta-llama/Llama-3.1-8B 模型,并通过使用分布式训练和优化技术(例如,使用 Hugging Face Transformers 库的 Fully-Sharded Data Parallel (FSDP) 和 LoRA)来执行监督微调 (SFT) 任务,该任务在 MedReason 数据集上进行,并通过 Amazon SageMaker 训练作业执行。
了解核心概念
Hugging Face Transformers 库是一个开源工具包,旨在通过启用对流行 Transformer 模型的无缝实验和部署来微调 LLM。
Transformers 库支持多种方法来实现 LLM 与特定目标的对齐,包括:
- 数千种预训练模型 – 访问 BERT、Meta Llama、Qwen、T5 等海量模型集合,可用于文本分类、翻译、摘要、问答、目标检测和语音识别等任务。
- Pipelines API – 通过一次调用处理分词、推理和输出格式化,简化了常见任务(如情感分析、摘要和图像分割)。
- Trainer API – 提供一个高级接口,用于训练和微调模型,支持混合精度、分布式训练以及与流行硬件加速器的集成等功能。
- 分词工具 – 高效且灵活的分词器,用于将原始文本转换为模型就绪的输入,支持多种语言和格式。
SageMaker 训练作业是一项全托管的、按需的机器学习 (ML) 服务,可在 AWS 基础设施上远程运行,使用您的数据、代码和选定的计算资源来训练模型。此服务抽象化了配置和管理底层基础设施的复杂性,因此您可以专注于开发和微调您的 ML 和基础模型。SageMaker 训练作业提供的关键功能包括:
- 全托管 – SageMaker 处理训练作业的资源配置、扩展和管理,因此您无需手动设置服务器或集群。
- 灵活的输入 – 您可以使用内置算法、预构建容器,或者引入自己的自定义训练脚本和 Docker 容器,以使用大多数流行框架(如 Hugging Face Transformers 库)执行训练工作负载。
- 可扩展 – 它支持单节点或跨多个实例的分布式训练,适用于小型和大型 ML 工作负载。
- 与多个数据源集成 – 训练数据可以存储在 Amazon Simple Storage Service (Amazon S3)、Amazon FSx 和 Amazon Elastic Block Store (Amazon EBS) 中,并且输出的模型工件在训练完成后会保存回 Amazon S3。
- 可定制 – 您可以为每次训练作业指定超参数、资源类型(如 GPU 或 CPU 实例)和其他设置。
- 高性价比选项 – 托管式 Spot 实例、灵活的训练计划 和异构集群等功能有助于优化训练成本。
解决方案概述
下图说明了将 Hugging Face Transformers 库与 SageMaker 训练作业一起使用的解决方案工作流程。
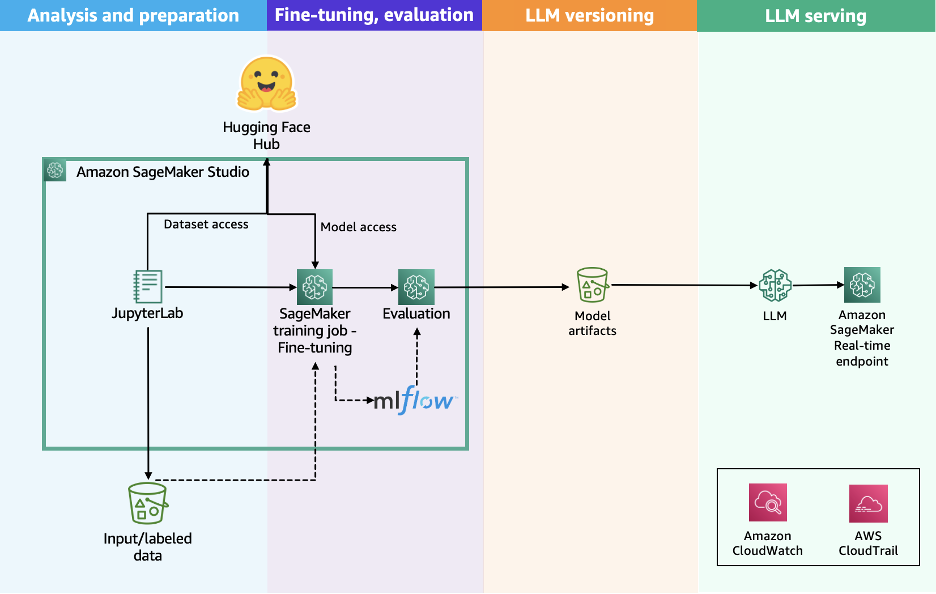
该工作流程包括以下步骤:
- 用户通过使用所选模型的特定提示风格来准备数据集。
- 用户通过使用 Hugging Face Transformers 库来启动训练工作负载来准备训练脚本,指定所选分布选项的配置,例如 Distributed Data Parallel (DDP) 或 Fully-Sharded Data Parallel (FSDP)。
- 用户向 SageMaker AI 提交 API 请求,传递训练脚本的位置、Hugging Face 训练容器 URI 以及所需的训练配置,例如分布算法、实例类型和实例数量。
- SageMaker AI 使用训练作业启动器脚本在托管计算集群上运行训练工作负载。根据所选配置,SageMaker AI 会配置所需的基础设施、编排分布式训练,并在完成后自动退役集群。
这种简化的架构提供了一个全托管的用户体验,帮助您快速开发训练代码、定义训练参数并选择首选的基础设施。SageMaker AI 以按秒计费的模式处理端到端的基础设施管理,只对净训练时间收费。
先决条件
在运行 Meta Llama 3.1 8B 微调 notebook 之前,您必须完成以下先决条件:
- 为 SageMaker AI 发出以下配额增加请求。对于此用例,您将需要请求至少 1 个
p4d.24xlarge实例(带有 8 个 NVIDIA A100 GPU),并根据您的用例的训练时间和成本权衡扩展到更多的p4d.24xlarge实例。为了帮助确定适合微调工作负载的正确集群大小,您可以使用 VRAM 计算器或 “Can it run LLM” 等工具。在 服务配额 控制台中,请求以下 SageMaker AI 配额:- 用于训练作业使用的 P4D 实例 (
p4.24xlarge): 1
- 用于训练作业使用的 P4D 实例 (
- 创建一个 AWS Identity and Access Management (IAM) 角色,具有托管策略
AmazonSageMakerFullAccess和AmazonS3FullAccess,以授予 SageMaker AI 运行示例所需的访问权限。 - 将以下策略作为信任关系分配给您的 IAM 角色:
{ "Version": "2012-10-17", "Statement": [ { "Sid": "", "Effect": "Allow", "Principal": { "Service": [ "sagemaker.amazonaws.com" ] }, "Action": "sts:AssumeRole" } ] } - (可选)创建一个 Amazon SageMaker Studio 域(参考 使用 Amazon SageMaker AI 的快速设置),以使用上述角色访问 Jupyter 笔记本。您也可以在本地设置中使用 JupyterLab
这些权限授予广泛的访问权限,不建议在生产环境中使用。请参阅 SageMaker 开发人员指南以获取定义更细粒度权限的指导。
准备数据集
要准备数据集,您必须加载 UCSC-VLAA/MedReason 数据集。MedReason 是一个大规模、高质量的医学推理数据集,旨在使 LLM 能够进行忠实且可解释的医学问题解决。下表显示了数据的一个示例。
| dataset_name | id_in_dataset | question | answer | reasoning | options |
|---|---|---|---|---|---|
| medmcqa | 7131 | Urogenital Diaphragm is made up of the following… | Colle’s fascia. Explanation: Colle’s fascia do… | Finding reasoning paths: 1. Urogenital diaphr… | Answer Choices: A. Deep transverse Perineus … |
| medmcqa | 7133 | Child with Type I Diabetes. What is the advise… | After 5 years. Explanation: Screening for diab… | **Finding reasoning paths:** 1. Type 1 Diab… | Answer Choices: A. After 5 years B. After 2 … |
| medmcqa | 7134 | Most sensitive test for H pylori is- |
Biopsy urease test. Explanation: Davidson&… |
**Finding reasoning paths:** 1. Consider th… | Answer Choices: A. Fecal antigen test B. Bio… |
我们希望使用以下列来准备我们的数据集:
- question – 提出的问题
- answer – 问题的正确答案
- reasoning – 如何得出正确答案的详细、分步的逻辑解释
我们可以使用以下步骤将输入格式化为 Meta Llama 3.1 使用的正确风格,并配置 Amazon S3 上用于 SageMaker 训练作业的数据通道:
- 加载 UCSC-VLAA/MedReason 数据集,使用原始数据集的前 10,000 行:
from datasets import load_dataset dataset = load_dataset("UCSC-VLAA/MedReason", split="train[:10000]") - 使用分词器的
apply_chat_template方法将适当的聊天模板应用于数据集:from transformers import AutoTokenizer tokenizer = AutoTokenizer.from_pretrained(model_id) def prepare_dataset(sample): system_text = ( "You are a deep-thinking AI assistant.\n\n" "For every user question, first write your thoughts and reasoning inside ... tags, then provide your answer." ) messages = [] messages.append({"role": "system", "content": system_text}) messages.append({"role": "user", "content": sample["question"]}) messages.append( { "role": "assistant", "content": f"\n{sample['reasoning']}\n\n{sample['answer']}", } ) # Apply chat template sample["text"] = tokenizer.apply_chat_template(messages, tokenize=False) return sampleprepare_dataset函数将迭代数据集中的元素,并使用apply_chat_template函数以以下形式获得提示模板:system {{SYSTEM_PROMPT}} user {{QUESTION}} assistant {{REASONING}} {{FINAL_ANSWER}}以下代码是格式化后的提示的一个示例:
<|begin_of_text|><|start_header_id|>system<|end_header_id|> You are a deep-thinking AI assistant. For every user question, first write your thoughts and reasoning inside ... tags, then provide your answer. <|eot_id|><|start_header_id|>user<|end_header_id|> A 66-year-old man presents to the emergency room with blurred vision, lightheadedness, and chest pain that started 30 minutes ago. The patient is awake and alert. His history is significant for uncontrolled hypertension, coronary artery disease, and he previously underwent percutaneous coronary intervention. He is afebrile. The heart rate is 102/min, the blood pressure is 240/135 mm Hg, and the O2 saturation is 100% on room air. An ECG is performed and shows no acute changes. A rapid intravenous infusion of a drug that increases peripheral venous capacitance is started. This drug has an onset of action that is less than 1 minute with rapid serum clearance than necessitates a continuous infusion. What is the most severe side effect of this medication? <|eot_id|><|start_header_id|>assistant<|end_header_id|> ### Finding Reasoning Paths: 1. **Blurred vision, lightheadedness, and chest pain** → Malignant hypertension → Rapid IV antihypertensive therapy. 2. **Uncontrolled hypertension and coronary artery disease** → Malignant hypertension → Rapid IV antihypertensive therapy. 3. **Severe hypertension (BP 240/135 mm Hg)** → Risk of end-organ damage → Malignant hypertension → Rapid IV antihypertensive therapy. 4. **Chest pain and history of coronary artery disease** → Risk of myocardial ischemia → Malignant hypertension → Rapid IV antihypertensive therapy. --- ### Reasoning Process: 1. **Clinical Presentation and Diagnosis**: - The patient presents with blurred vision... ... Cyanide poisoning <|eot_id|><|end_of_text|> - 将数据集拆分为训练、验证和测试数据集:
from datasets import Dataset, DatasetDict from random import randint train_dataset = Dataset.from_pandas(train) val_dataset = Dataset.from_pandas(val) test_dataset = Dataset.from_pandas(test) dataset = DatasetDict({"train": train_dataset, "val": val_dataset}) train_dataset = dataset["train"].map( prepare_dataset, remove_columns=list(train_dataset.features) ) val_dataset = dataset["val"].map( prepare_dataset, remove_columns=list(val_dataset.features) ) - 通过将它们保存为 JSON 文件并构建将上传这些文件的 S3 路径,为 SageMaker 训练作业准备训练和验证数据集:
...
train_dataset.to_json("./data/train/dataset.jsonl")
val_dataset.to_json("./data/val/dataset.jsonl")
s3_client.upload_file(
    "./data/train/dataset.jsonl",
    bucket_name,
    f"{input_path}/train/dataset.jsonl"
)
s3_client.upload_file(
    "./data/val/dataset.jsonl",
    bucket_name,
    f"{input_path}/val/dataset.jsonl"
)
准备训练脚本
为了使用 SageMaker 训练作业对 meta-llama/Llama-3.1-8B 进行微调,我们准备了 train.py 文件,该文件作为训练作业的入口点来执行微调工作负载。
训练过程可以使用 Trainer 或 SFTTrainer 类来微调我们的模型。这简化了 LLM 的持续预训练过程。这种方法使微调对于根据特定任务或领域调整预训练模型变得高效。
Trainer 和 SFTTrainer 类都有助于使用 Hugging Face transformers 进行模型训练。Trainer 类是用于在广泛任务上训练和评估 Transformer 模型(包括文本分类、序列标记和文本生成)的标准高级 API。SFTTrainer 是一个子类,专为 LLM 的监督微调而构建,特别适用于指令遵循或对话任务。
为加速模型微调,我们使用 FSDP 技术来分配训练工作负载。这是一种先进的并行技术,旨在训练可能不适合单个 GPU 内存的大型模型,具有以下优点:
- 参数分片 – FSDP 不是将整个模型复制到每个 GPU 上,而是将模型参数、优化器状态和梯度分散(分片)到各个 GPU 上。
- 内存效率 – 通过分片,FSDP 大幅减少了每个设备的内存占用,从而可以训练更大的模型或更大的批次大小。
- 同步 – 在训练期间,FSDP 仅收集每个计算步骤所需的参数,然后在之后立即释放内存,进一步节省资源。
- CPU 卸载 – 可选地,FSDP 可以将某些数据卸载到 CPU,以节省更多 GPU 内存。
- 在我们的示例中,我们使用
Trainer类并定义所需的TrainingArguments来执行 FSDP 分布式工作负载:from transformers import ( Trainer, TrainingArguments ) trainer = Trainer( model=model, train_dataset=train_ds, eval_dataset=test_ds if test_ds is not None else None, args=transformers.TrainingArguments( **training_args, ), callbacks=callbacks, data_collator=transformers.DataCollatorForLanguageModeling(tokenizer, mlm=False) ) - 为进一步优化微调工作负载,我们使用了 QLoRA 技术,它将预训练语言模型量化为 4 位并附加经过微调的小型低秩适配器:
from transformers import ( AutoModelForCausalLM, AutoTokenizer, BitsAndBytesConfig, ) # Load the tokenizer tokenizer = AutoTokenizer.from_pretrained(script_args.model_id) # Define PAD token tokenizer.pad_token = tokenizer.eos_token # Configure quantization bnb_config = BitsAndBytesConfig( load_in_4bit=True, bnb_4bit_use_double_quant=True, bnb_4bit_quant_type="nf4", bnb_4bit_compute_dtype=torch.bfloat16, bnb_4bit_quant_storage=torch.bfloat16 ) # Load the model model = AutoModelForCausalLM.from_pretrained( script_args.model_id, trust_remote_code=True, quantization_config=bnb_config, use_cache=not training_args.gradient_checkpointing, cache_dir="/tmp/.cache", **model_configs, ) script_args和training_args在配置配方.yaml文件中作为 SageMaker 训练作业的超参数提供,并在train.py文件中通过使用 Hugging Face TRL 提供的TrlParser类进行解析:model_id: "meta-llama/Llama-3.1-8B-Instruct" # Hugging Face model id # sagemaker specific parameters output_dir: "/opt/ml/model" # path to where SageMaker will upload the model checkpoint_dir: "/opt/ml/checkpoints/" # path to where SageMaker will upload the model checkpoints train_dataset_path: "/opt/ml/input/data/train/" # path to where S3 saves train dataset val_dataset_path: "/opt/ml/input/data/val/" # path to where S3 saves test dataset save_steps: 100 # Save checkpoint every this many steps token: "" # training parameters lora_r: 32 lora_alpha:64 lora_dropout: 0.1 learning_rate: 2e-4 # learning rate scheduler num_train_epochs: 2 # number of training epochs per_device_train_batch_size: 4 # batch size per device during training per_device_eval_batch_size: 2 # batch size for evaluation gradient_accumulation_steps: 4 # number of steps before performing a backward/update pass gradient_checkpointing: true # use gradient checkpointing bf16: true # use bfloat16 precision tf32: false # use tf32 precision fsdp: "full_shard auto_wrap offload" #FSDP configurations fsdp_config: backward_prefetch: "backward_pre" cpu_ram_efficient_loading: true offload_params: true forward_prefetch: false use_orig_params: true warmup_steps: 100 weight_decay: 0.01 merge_weights: true # merge weights in the base model对于已实施的用例,我们决定使用以下值来微调适配器:
- lora_r: 32 – 允许适配器捕获更复杂的推理转换。
- lora_alpha: 64 – 考虑到我们试图改进的推理任务,此值允许适配器对基础模型产生重大影响。
- lora_dropout: 0.05 – 我们希望通过避免破坏重要的推理连接来保留推理连接。
- warmup_steps: 100 – 逐渐将学习率增加到指定值。对于此推理任务,我们希望模型学习新结构而不忘记先前的知识。
- weight_decay: 0.01 – 保持模型泛化能力。
- 通过将它们保存为 JSON 文件并构建将上传这些文件的 S3 路径,准备 SageMaker 训练作业的配置文件:
import os
if default_prefix:
    input_path = f"{default_prefix}/datasets/llm-fine-tuning-modeltrainer-sft"
else:
    input_path = f"datasets/llm-fine-tuning-modeltrainer-sft"

train_config_s3_path = f"s3://{bucket_name}/{input_path}/config/args.yaml"

# upload the model yaml file to s3
model_yaml = "args.yaml"
s3_client.upload_file(model_yaml, bucket_name, f"{input_path}/config/args.yaml")

os.remove("./args.yaml")

print(f"Training config uploaded to:")
print(train_config_s3_path)
使用 SageMaker 训练作业进行 SFT 训练
要使用 SFT 训练脚本和 SageMaker 训练作业运行微调工作负载,我们使用 ModelTrainer 类。
ModelTrainer 类是一种更直观的模型训练方法,它显著增强了用户体验并支持分布式训练、构建自己的容器 (BYOC) 和配方。有关其他信息,请参阅 SageMaker Python SDK 文档。
通过以下步骤设置微调工作负载:
- 指定实例类型、训练作业的容器映像以及模型将存储的检查点路径:
instance_type = "ml.p4d.24xlarge" instance_count = 1 image_uri = image_uris.retrieve( framework="huggingface", region=sagemaker_session.boto_session.region_name, version="4.56.2", base_framework_version="pytorch2.8.0", instance_type=instance_type, image_scope="training", ) - 通过指向创建的
train.py来定义源代码配置:from sagemaker.train.configs import SourceCode source_code = SourceCode( source_dir="./scripts", requirements="requirements.txt", entry_script="train.py", ) - 配置训练计算,可选地提供参数
keep_alive_period_in_seconds以使用托管式热池,在实验阶段保留并重用集群:from sagemaker.train.configs import Compute compute_configs = Compute( instance_type=instance_type, instance_count=instance_count, keep_alive_period_in_seconds=0, ) - 创建
ModelTrainer函数,提供所需的训练设置,并定义参数distributed=Torchrun()以使用 torchrun 作为启动器,以便在所选实例的可用 GPU 上以分布式方式执行训练作业:from sagemaker.train.configs import ( CheckpointConfig, OutputDataConfig, StoppingCondition, ) from sagemaker.train.distributed import Torchrun from sagemaker.train.model_trainer import ModelTrainer # define Training Job Name job_name = f"train-{model_id.split('/')[-1].replace('.', '-')}-sft" # define OutputDataConfig path output_path = f"s3://{bucket_name}/{job_name}" # Define the ModelTrainer model_trainer = ModelTrainer( training_image=image_uri, source_code=source_code, base_job_name=job_name, compute=compute_configs, distributed=Torchrun(), stopping_condition=StoppingCondition(max_runtime_in_seconds=18000), hyperparameters={ "config": "/opt/ml/input/data/config/args.yaml" # path to TRL config which was uploaded to s3 }, output_data_config=OutputDataConfig(s3_output_path=output_path), checkpoint_config...
🚀 想要体验更好更全面的 AI 调用?
欢迎使用青云聚合API,约为官网价格的十分之一,支持300+全球最新模型,以及全球各种生图生视频模型,无需翻墙高速稳定,文档丰富,小白也可以简单操作。
评论区