


📢 转载信息
原文作者:Nadhya Polanco and Brajendra Singh
将机器学习 (ML) 模型部署到生产环境通常是一项复杂且资源密集型的任务,特别是对于那些没有深厚 ML 和 DevOps 专业知识的客户而言。 Amazon SageMaker Canvas 通过提供一个无代码界面简化了模型构建,因此您可以使用现有的数据源创建高精度 ML 模型,而无需编写任何代码。但是,构建模型只是旅程的一半;高效且经济地部署它同样至关重要。Amazon SageMaker 无服务器推理 (Serverless Inference) 专为流量模式可变和存在空闲时期的工作负载而设计。它根据需求自动预置和扩展基础设施,从而无需管理服务器或预先配置容量。
在本文中,我们将指导您完成如何采用在 SageMaker Canvas 中构建的 ML 模型并使用 SageMaker 无服务器推理进行部署的过程。此解决方案可以帮助您快速、高效地从模型创建过渡到生产级预测,同时无需管理任何基础设施。
解决方案概述
为了演示 SageMaker Canvas 训练模型的无服务器端点创建过程,我们来看一个示例工作流程:
- 将训练好的模型添加到 Amazon SageMaker 模型注册表 (Model Registry)。
- 使用正确的配置创建一个新的 SageMaker 模型。
- 创建一个无服务器端点配置。
- 使用创建的模型和端点配置部署无服务器端点。
您也可以实现流程自动化,如下面的图表所示。
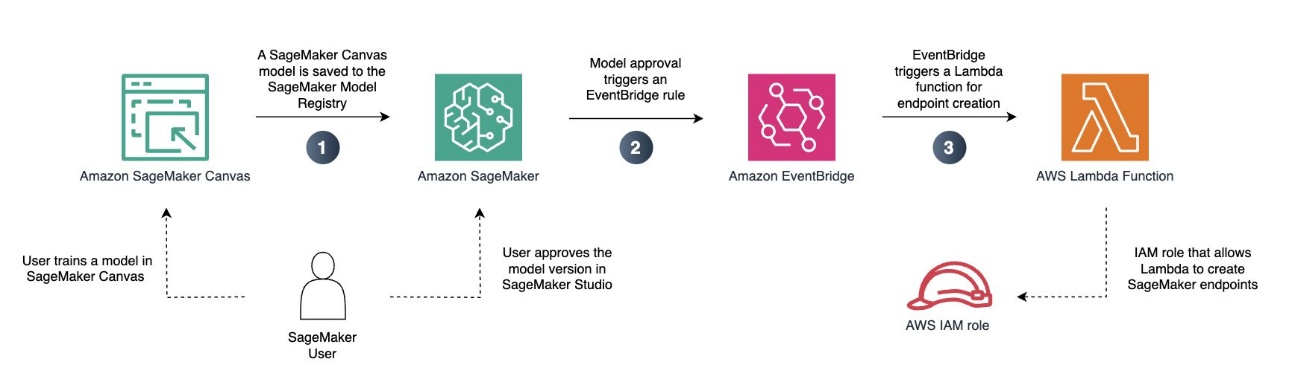
在此示例中,我们将一个预训练的回归模型部署到无服务器的 SageMaker 端点。这样,我们就可以在不需要实时推理的可变工作负载中使用我们的模型。
先决条件
作为先决条件,您必须有权访问 Amazon Simple Storage Service (Amazon S3) 和 Amazon SageMaker AI。如果您尚未在账户中配置 SageMaker AI 域,还需要具有 创建 SageMaker AI 域的权限。
您还必须有一个已训练的回归模型或分类模型。您可以像往常一样训练您的 SageMaker Canvas 模型。这包括创建 Amazon SageMaker Data Wrangler 流、执行必要的数据转换,以及选择模型训练配置。如果您还没有训练好的模型,可以按照 Amazon SageMaker Canvas Immersion Day 中的一个实验来创建一个,然后再继续。在此示例中,我们使用了一个在 canvas-sample-shipping-logs.csv 示例数据集上训练的分类模型。
将模型保存到 SageMaker 模型注册表
完成以下步骤将您的模型保存到 SageMaker 模型注册表:
- 在 SageMaker AI 控制台中,选择 Studio 以启动 Amazon SageMaker Studio。
- 在 SageMaker Studio 界面中,启动 SageMaker Canvas,它将在新标签页中打开。
- 找到要部署到无服务器端点的模型和模型版本。
- 在选项菜单(三个垂直点)上,选择 添加到模型注册表 (Add to Model Registry)。
现在您可以退出 SageMaker Canvas(通过注销)。为了管理成本并防止额外的 工作区费用,您还可以配置 SageMaker Canvas 在 空闲时自动关机。
批准模型进行部署
将模型添加到模型注册表后,完成以下步骤:
- 在 SageMaker Studio UI 中,在导航窗格中选择 模型 (Models)。
您刚刚从 SageMaker Canvas 导出的模型应显示为 等待人工批准 (Pending manual approval) 部署状态。
- 选择要部署的模型版本,然后通过选择部署状态将其状态更新为 批准 (Approved)。
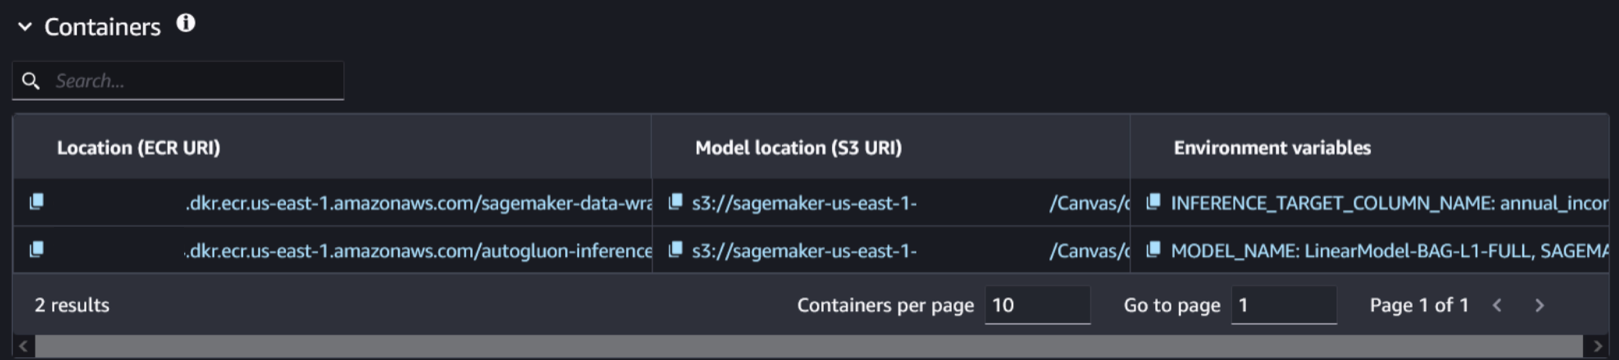
- 选择模型版本并导航到 部署 (Deploy) 选项卡。您可以在此处找到与模型和关联容器相关的信息。
- 选择与训练模型相关的容器和模型位置。您可以通过检查是否存在环境变量
SAGEMAKER_DEFAULT_INVOCATIONS_ACCEPT来识别它。
创建新模型
完成以下步骤以创建新模型:
- 在不关闭 SageMaker Studio 标签页的情况下,打开一个新标签页并打开 SageMaker AI 控制台。
- 在 推理 (Inference) 部分中,选择 模型 (Models),然后选择 创建模型 (Create model)。
- 命名您的模型。
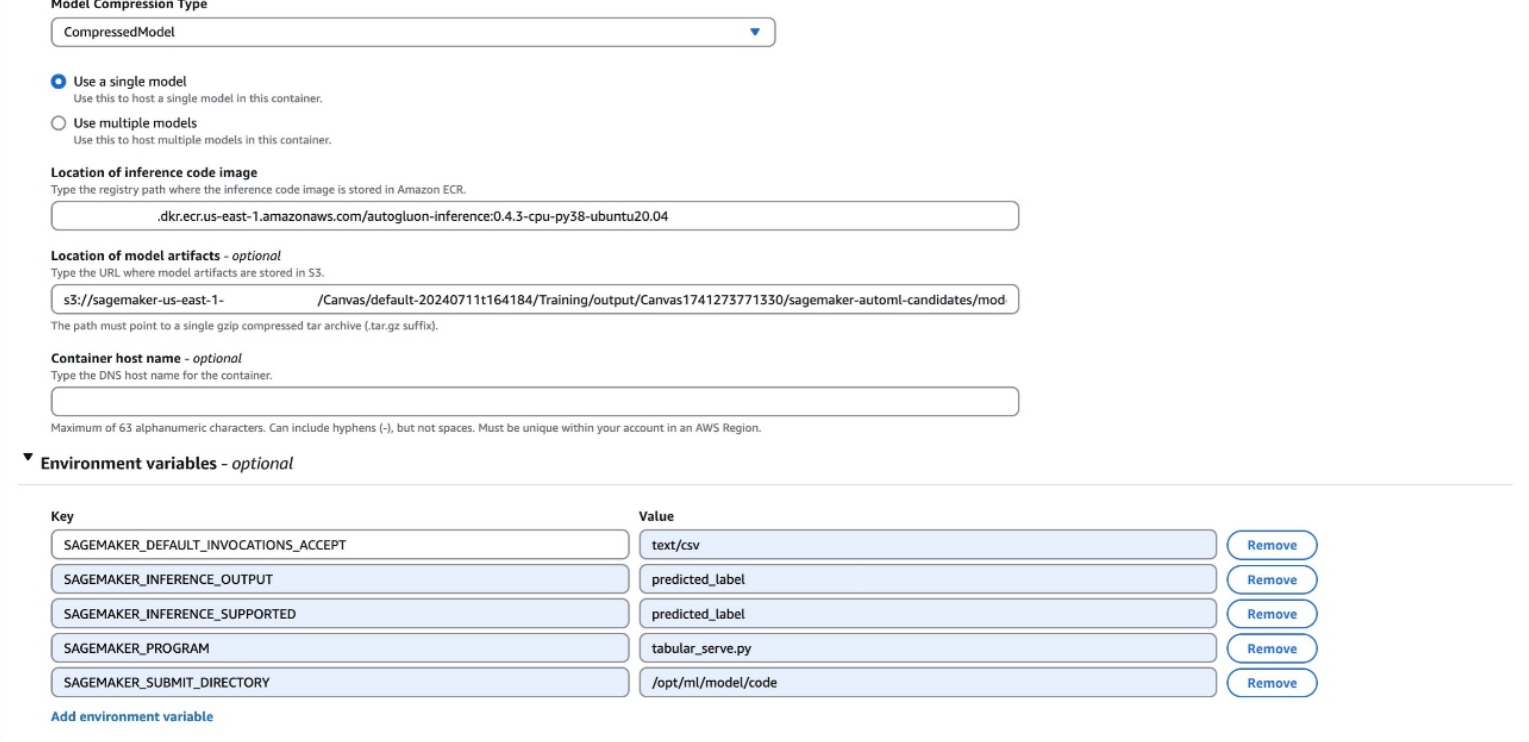
- 将容器输入选项保留为 提供模型工件和推理映像位置 (Provide model artifacts and inference image location),并使用
CompressedModel类型。 - 输入您在上一步中找到的 Amazon Elastic Container Registry (Amazon ECR) URI、Amazon S3 URI 和环境变量。
环境变量将在 SageMaker Studio 中显示为单行,格式如下:
SAGEMAKER_DEFAULT_INVOCATIONS_ACCEPT: text/csv, SAGEMAKER_INFERENCE_OUTPUT: predicted_label, SAGEMAKER_INFERENCE_SUPPORTED: predicted_label, SAGEMAKER_PROGRAM: tabular_serve.py, SAGEMAKER_SUBMIT_DIRECTORY: /opt/ml/model/code您的变量可能与前面的示例不同。所有环境变量都应添加到您的模型中。创建新模型时,请确保每个环境变量独占一行。
- 选择 创建模型 (Create model)。
创建端点配置
完成以下步骤以创建端点配置:
- 在 SageMaker AI 控制台上,选择 端点配置 (Endpoint configurations) 以创建一个新的模型端点配置。
- 将端点类型设置为 无服务器 (Serverless),并将模型变体设置为上一步中创建的模型。
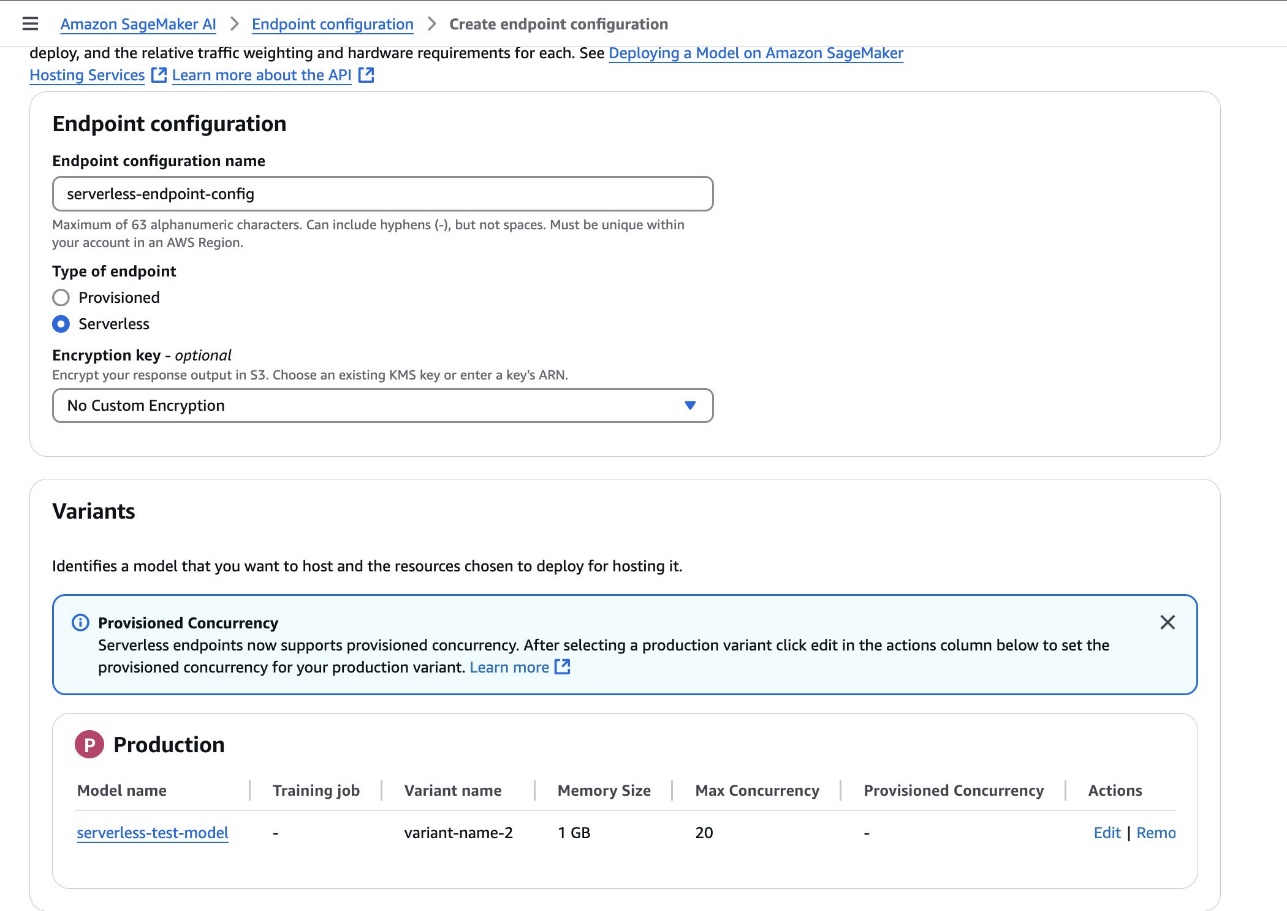
- 选择 创建端点配置 (Create endpoint configuration)。
创建端点
完成以下步骤以创建一个端点:
- 在 SageMaker AI 控制台中,在导航窗格中选择 端点 (Endpoints) 并创建一个新端点。
- 命名该端点。
- 选择上一步中创建的端点配置,然后选择 选择端点配置 (Select endpoint configuration)。
- 选择 创建端点 (Create endpoint)。

端点可能需要几分钟才能创建完成。当状态更新为 InService 时,您可以开始调用该端点。
以下示例代码演示了如何从位于 SageMaker Studio 环境中的 Jupyter notebook 调用端点:
import boto3
import csv
from io import StringIO
import time

def invoke_shipping_prediction(features):
    sagemaker_client = boto3.client('sagemaker-runtime')
    # Convert to CSV string format
    output = StringIO()
    csv.writer(output).writerow(features)
    payload = output.getvalue()

    response = sagemaker_client.invoke_endpoint(
        EndpointName='canvas-shipping-data-model-1-serverless-endpoint',
        ContentType='text/csv',
        Accept='text/csv',
        Body=payload
    )

    response_body = response['Body'].read().decode()
    reader = csv.reader(StringIO(response_body))
    result = list(reader)[0] # Get first row

    # Parse the response into a more usable format
    prediction = {
        'predicted_label': result[0],
        'confidence': float(result[1]),
        'class_probabilities': eval(result[2]),
        'possible_labels': eval(result[3])
    }
    return prediction

# Features for inference
features_set_1 = [
    "Bell", "Base", 14, 6, 11, 11, "GlobalFreight", "Bulk Order", "Atlanta", "2020-09-11 00:00:00", "Express", 109.25199890136719
]

features_set_2 = [
    "Bell", "Base", 14, 6, 15, 15, "MicroCarrier", "Single Order", "Seattle", "2021-06-22 00:00:00", "Standard", 155.0483856201172
]

# Invoke the SageMaker endpoint for feature set 1
start_time = time.time()
result = invoke_shipping_prediction(features_set_1)

# Print Output and Timing
end_time = time.time()
total_time = end_time - start_time
print(f"Total response time with endpoint cold start: {total_time:.3f} seconds")
print(f"Prediction for feature set 1: {result['predicted_label']}")
print(f"Confidence for feature set 1: {result['confidence']*100:.2f}%")
print("\nProbabilities for feature set 1:")
for label, prob in zip(result['possible_labels'], result['class_probabilities']):
    print(f"{label}: {prob*100:.2f}%")

print("---------------------------------------------------------")

# Invoke the SageMaker endpoint for feature set 2
start_time = time.time()
result = invoke_shipping_prediction(features_set_2)

# Print Output and Timing
end_time = time.time()
total_time = end_time - start_time
print(f"Total response time with warm endpoint: {total_time:.3f} seconds")
print(f"Prediction for feature set 2: {result['predicted_label']}")
print(f"Confidence for feature set 2: {result['confidence']*100:.2f}%")
print("\nProbabilities for feature set 2:")
for label, prob in zip(result['possible_labels'], result['class_probabilities']):
    print(f"{label}: {prob*100:.2f}%")
自动化流程
为了在每次批准新模型时自动创建无服务器端点,您可以使用以下包含 AWS CloudFormation 的 YAML 文件。此文件将自动化 SageMaker 端点的创建,使用您指定的配置。
此 CloudFormation 模板示例仅供参考,不应用于直接生产环境。开发人员应在部署前根据其组织的安全指南彻底测试此模板。
AWSTemplateFormatVersion: "2010-09-09"
Description: Template for creating Lambda function to handle SageMaker model package state changes and create serverless endpoints

Parameters:
  MemorySizeInMB:
    Type: Number
    Default: 1024
    Description: Memory size in MB for the serverless endpoint (between 1024 and 6144)
    MinValue: 1024
    MaxValue: 6144
  MaxConcurrency:
    Type: Number
    Default: 20
    Description: Maximum number of concurrent invocations for the serverless endpoint
    MinValue: 1
    MaxValue: 200
  AllowedRegion:
    Type: String
    Default: "us-east-1"
    Description: AWS region where SageMaker resources can be created
  AllowedDomainId:
    Type: String
    Description: SageMaker Studio domain ID that can trigger deployments
  AllowedDomainIdParameterName:
    Type: String
    Default: "/sagemaker/serverless-deployment/allowed-domain-id"
    Description: SSM Parameter name containing the SageMaker Studio domain ID that can trigger deployments

NoEcho: true

Resources:
  AllowedDomainIdParameter:
    Type: AWS::SSM::Parameter
    Properties:
      Name: !Ref AllowedDomainIdParameterName
      Type: String
      Value: !Ref AllowedDomainId
      Description: SageMaker Studio domain ID that can trigger deployments

  SageMakerAccessPolicy:
    Type: AWS::IAM::ManagedPolicy
    Properties:
      Description: Managed policy for SageMaker serverless endpoint creation
      PolicyDocument:
        Version: "2012-10-17"
        Statement:
          - Effect: Allow
            Action:
              - sagemaker:CreateModel
              - sagemaker:CreateEndpointConfig
              - sagemaker:CreateEndpoint
              - sagemaker:DescribeModel
              - sagemaker:DescribeEndpointConfig
              - sagemaker:DescribeEndpoint
              - sagemaker:DeleteModel
              - sagemaker:DeleteEndpointConfig
              - sagemaker:DeleteEndpoint
            Resource: !Sub "arn:aws:sagemaker:${AllowedRegion}:${AWS::AccountId}:*"
          - Effect: Allow
            Action:
              - sagemaker:DescribeModelPackage
            Resource: !Sub "arn:aws:sagemaker:${AllowedRegion}:${AWS::AccountId}:model-package/*/*"
          - Effect: Allow
            Action:
              - iam:PassRole
            Resource: !Sub "arn:aws:iam::${AWS::AccountId}:role/service-role/AmazonSageMaker-ExecutionRole-*"
            Condition:
              StringEquals:
                "iam:PassedToService": "sagemaker.amazonaws.com"
          - Effect: Allow
            Action:
              - ssm:GetParameter
            Resource: !Sub "arn:aws:ssm:${AllowedRegion}:${AWS::AccountId}:parameter${AllowedDomainIdParameterName}"

  LambdaExecutionRole:
    Type: AWS::IAM::Role
    Properties:
      AssumeRolePolicyDocument:
        Version: "2012-10-17"
        Statement:
          - Effect: Allow
            Principal:
              Service: lambda.amazonaws.com
            Action: sts:AssumeRole
      ManagedPolicyArns:
        - arn:aws:iam::aws:policy/service-role/AWSLambdaBasicExecutionRole
        - !Ref SageMakerAccessPolicy

  ModelDeploymentFunction:
    Type: AWS::Lambda::Function
    Properties:
      Handler: index.handler
      Role: !GetAtt LambdaExecutionRole.Arn
      Code:
        ZipFile: |
          import os
          import json
          import boto3

          sagemaker_client = boto3.client('sagemaker')
          ssm_client = boto3.client('ssm')

          def handler(event, context):
              print(f"Received event: {json.dumps(event, indent=2)}")

              try:
                  # Get details directly from the event
                  detail = event['detail']
                  print(f'detail: {detail}')

                  # Get allowed domain ID from SSM Parameter Store
                  parameter_name = os.environ.get('ALLOWED_DOMAIN_ID_PARAMETER_NAME')
                  try:
                      response = ssm_client.get_parameter(Name=parameter_name)
                      allowed_domain = response['Parameter']['Value']
                  except Exception as e:
                      print(f"Error retrieving parameter {parameter_name}: {str(e)}")
                      allowed_domain = '*'
                      # Default fallback

                  # Check if domain ID is allowed
                  if allowed_domain != '*':
                      created_by_domain = detail.get('CreatedBy', {}).get('DomainId')
                      if created_by_domain != allowed_domain:
                          print(f"Domain {created_by_domain} not allowed. Allowed: {allowed_domain}")
                          return {'statusCode': 403, 'body': 'Domain not authorized'}

                  # Get the model package ARN from the event
                  model_package_arn = event['resources'][0]

                  # Get the model package details from SageMaker
                  model_package_response = sagemaker_client.describe_model_package(ModelPackageName=model_package_arn)

                  # Parse model name and version from ModelPackageName
                  model_name, version = detail['ModelPackageName'].split('/')
                  serverless_model_name = f"{model_name}-{version}-serverless"

                  # Get all container details directly from the event
                  container_defs = detail['InferenceSpecification']['Containers']

                  # Get the execution role from the event and convert to proper IAM role ARN format
                  assumed_role_arn = detail['CreatedBy']['IamIdentity']['Arn']
                  execution_role_arn = assumed_role_arn.replace(':sts:', ':iam:')\
                                      .replace('assumed-role', 'role/service-role')\
                                      .rsplit('/', 1)[0]

                  # Prepare containers configuration for the model
                  containers = []
                  for i, container_def in enumerate(container_defs):
                      # Get environment variables from the model package for this container
                      environment_vars = model_package_response['InferenceSpecification']['Containers'][i].get('Environment', {}) or {}
                      containers.append({
                          'Image': container_def['Image'],
                          'ModelDataUrl': container_def['ModelDataUrl'],
                          'Environment': environment_vars
                      })

                  # Create model with all containers
                  if len(containers) == 1:
                      # Use PrimaryContainer if there's only one container
                      create_model_response = sagemaker_client.create_model(
                          ModelName=serverless_model_name,
                          PrimaryContainer=containers[0],
                          ExecutionRoleArn=execution_role_arn
                      )
                  else:
                      # Use Containers parameter for multiple containers
                      create_model_response = sagemaker_client.create_model(
                          ModelName=serverless_model_name,
                          Containers=containers,
                          ExecutionRoleArn=execution_role_arn
                      )

                  # Create endpoint config
                  endpoint_config_name = f"{serverless_model_name}-config"
                  create_endpoint_config_response = sagemaker_client.create_endpoint_config(
                      EndpointConfigName=endpoint_config_name,
                      ProductionVariants=[
                          {
                              'VariantName': 'AllTraffic',
                              'ModelName': serverless_model_name,
                              'ServerlessConfig': {
                                  'MemorySizeInMB': int(os.environ.get('MEMORY_SIZE_IN_MB')),
                                  'MaxConcurrency': int(os.environ.get('MAX_CONCURRENT_INVOCATIONS'))
                              }
                          }
                      ]
                  )

                  # Create endpoint
                  endpoint_name = f"{serverless_model_name}-endpoint"
                  create_endpoint_response = sagemaker_client.create_endpoint(
                      EndpointName=endpoint_name,
                      EndpointConfigName=endpoint_config_name
                  )

                  return {
                      'statusCode': 200,
                      'body': json.dumps({
                          'message': 'Serverless endpoint deployment initiated',
                          'endpointName': endpoint_name
                      })
                  }
              except Exception as e:
                  print(f"Error: {str(e)}")
                  raise

      Runtime: python3.12
      Timeout: 300
      MemorySize: 128
      Environment:
        Variables:
          MEMORY_SIZE_IN_MB: !Ref MemorySizeInMB
          MAX_CONCURRENT_INVOCATIONS: !Ref MaxConcurrency
          ALLOWED_DOMAIN_ID_PARAMETER_NAME: !Ref AllowedDomainIdParameterName

  EventRule:
    Type: AWS::Events::Rule
    Properties:
      Description: Rule to trigger Lambda when SageMaker Model Package state changes
      EventPattern:
        source:
          - aws.sagemaker
        detail-type:
          - SageMaker Model Package State Change
        detail:
          ModelApprovalStatus:
            - Approved
          UpdatedModelPackageFields:
            - ModelApprovalStatus
      State: ENABLED
      Targets:
        - Arn: !GetAtt ModelDeploymentFunction.Arn
          Id: ModelDeploymentFunction

  LambdaInvokePermission:
    Type: AWS::Lambda::Permission
    Properties:
      FunctionName: !Ref ModelDeploymentFunction
      Action: lambda:InvokeFunction
      Principal: events.amazonaws.com
      SourceArn: !GetAtt EventRule.Arn

Outputs:
  LambdaFunctionArn:
    Description: ARN of the Lambda function
    Value: !GetAtt ModelDeploymentFunction.Arn
  EventRuleArn:
    Description: ARN of the EventBridge rule
    Value: !GetAtt EventRule.Arn
此堆栈将限制自动创建无服务器端点的 AWS 区域和域。当您从 SageMaker Studio 控制台访问 SageMaker Studio 时,或者运行以下命令:aws sagemaker list-domains —region [your-region] 时,可以找到您的域 ID。
清理
为了管理成本并防止额外的 工作区费用,请确保您已退出 SageMaker Canvas。如果您使用 Jupyter notebook 测试了端点,可以通过选择 停止 (Stop) 或配置 JupyterLab 的自动关机来关闭您的 JupyterLab 实例。

在本文中,我们展示了如何使用 SageMaker 无服务器推理将 SageMaker Canvas 模型部署到无服务器端点。通过使用这种无服务器方法,您可以快速有效地服务来自 SageMaker Canvas 模型的预测,而无需管理底层基础设施。
这种无缝的部署体验只是 AWS 服务(如 SageMaker Canvas 和 SageMaker Serverless Inference)如何简化 ML 旅程的一个示例,帮助不同规模和技术水平的企业释放 AI 和 ML 的价值。在您继续探索 SageMaker 生态系统时,请务必了解如何使用 Amazon DataZone 解锁无代码 ML 的数据治理,以及如何使用 SageMaker Canvas 和 SageMaker Studio 无缝切换无代码和代码优先的模型开发。
🚀 想要体验更好更全面的AI调用?
欢迎使用青云聚合API,约为官网价格的十分之一,支持300+全球最新模型,以及全球各种生图生视频模型,无需翻墙高速稳定,文档丰富,小白也可以简单操作。
评论区