


📢 转载信息
原文作者:Iván Palomares Carrascosa
在本文中,您将了解到什么是数据泄露,它是如何悄无声息地抬高模型性能的,以及在常见工作流程中预防数据泄露的实用模式。
我们将涵盖的主题包括:
- 识别目标泄露并移除目标衍生特征。
- 通过正确排序预处理步骤来防止训练-测试污染。
- 在时间序列中,通过合理的设计特征和分割来避免时间泄露。
让我们开始吧。
数据泄露可能破坏模型的3种微妙方式(以及如何预防)
图片来源:编辑
引言
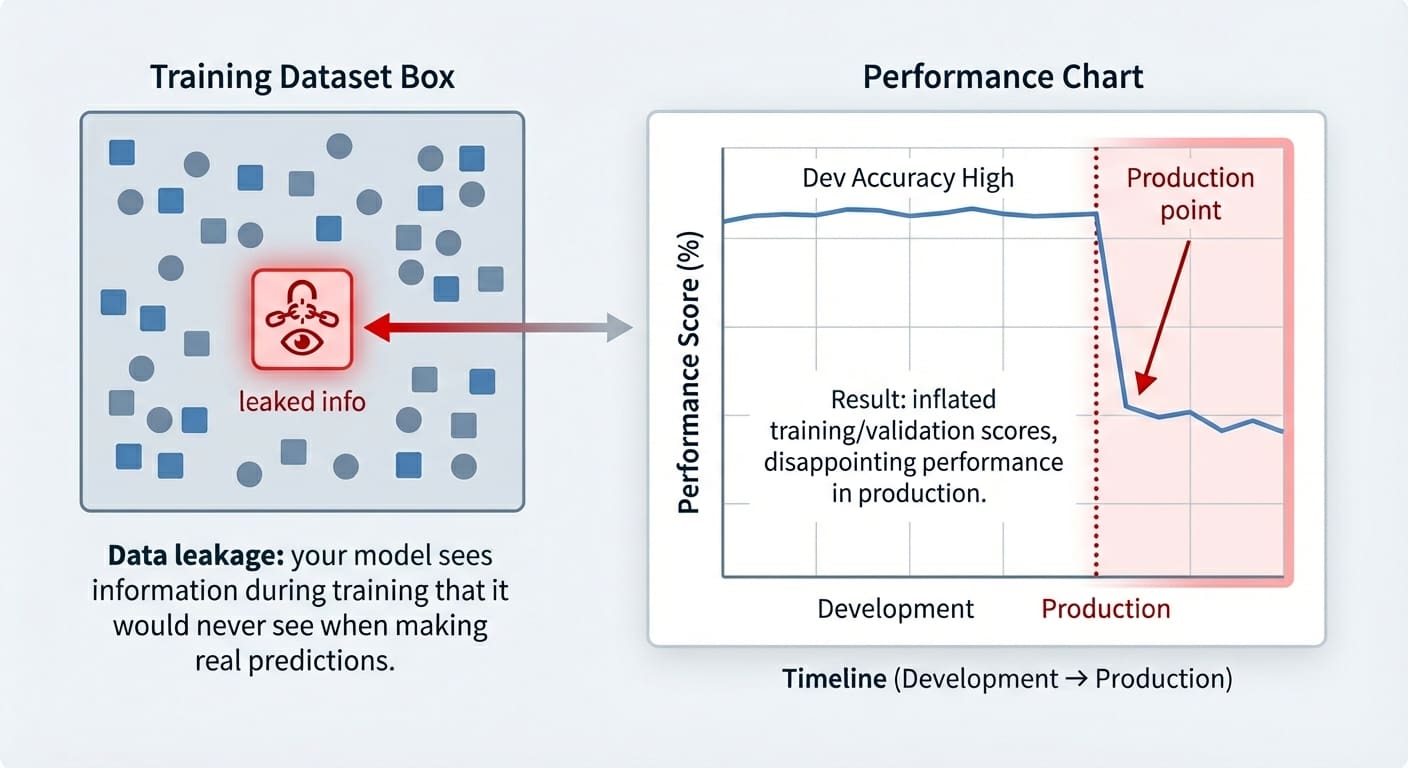
数据泄露(Data leakage)是机器学习建模中一个常发生的意外问题。它发生在用于训练的数据中包含了在当前阶段“本不应该被知晓”的信息时——即这些信息已经泄露,并作为“入侵者”混入了训练集中。其结果是,训练好的模型获得了一种不公平的优势,但这只在非常短的时间内有效:它可能在训练样本(最多在验证样本)上表现得好得出奇,但随后在未来的未见数据上表现得非常糟糕。
本文将展示三种可能发生数据泄露的机器学习实用场景,重点说明它们如何影响训练好的模型,并展示在每种场景中预防此问题的策略。涵盖的数据泄露场景包括:
- 目标泄露(Target leakage)
- 训练-测试集污染(Train-test split contamination)
- 时间序列数据中的时间泄露(Temporal leakage in time series data)
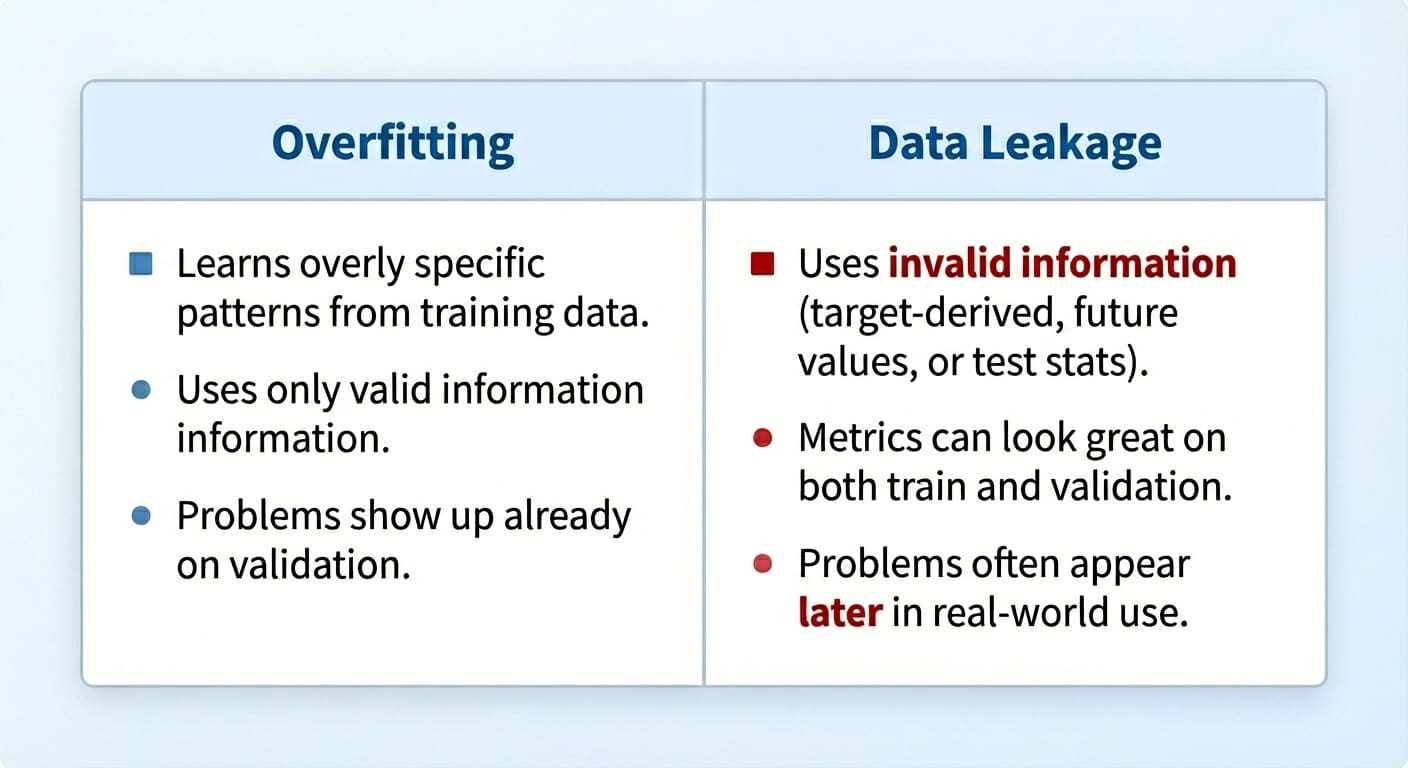
数据泄露与过拟合的区别
尽管数据泄露和过拟合可能产生相似的结果,但它们是不同的问题。
过拟合(Overfitting)发生在模型记住了训练集中过于特定的模式,但模型不一定接收到了在训练阶段本不应该知道的非法信息——它只是过度学习了训练数据。
相比之下,数据泄露(Data leakage)发生在模型在训练期间接触到了它不应接触的信息。此外,虽然过拟合通常表现为模型在验证集上泛化能力差,但数据泄露的后果可能只会在稍后阶段才显现,有时甚至在模型接触到真正未见数据并投入生产时才暴露出来。
数据泄露与过拟合
图片来源:编辑
让我们深入探讨3个具体的数据泄露场景。
场景1:目标泄露
当特征包含直接或间接揭示目标变量信息时,就会发生目标泄露。有时这是由于错误地应用特征工程过程,引入了目标衍生特征所致。将包含此类特征的训练数据传递给模型,就像一个学生在考试中作弊一样:他们本应自己得出的一些答案已经被提供给了他们。
本文中的示例使用了 scikit-learn、Pandas 和 NumPy。
让我们看一个在使用糖尿病数据集进行训练时可能出现此问题的示例。为此,我们将故意加入一个从目标变量'target'派生出来的预测特征(当然,在实践中这个问题往往是偶然发生的,但在本例中我们是故意注入它来演示问题的表现形式!):
|
1
2
3
4
5
6
7
8
9
10
11
12
13
14
15
16
17
18
19
20
|
from sklearn.datasets import load_diabetes
import pandas as pd
import numpy as np
from sklearn.linear_model import LogisticRegression
from sklearn.model_selection import train_test_split
X, y = load_diabetes(return_X_y=True, as_frame=True)
df = X.copy()
df['target'] = (y > y.median()).astype(int) # Binary outcome
# Add leaky feature: related to the target but with some random noise
df['leaky_feature'] = df['target'] + np.random.normal(0, 0.5, size=len(df))
# Train and test model with leaky feature
X_leaky = df.drop(columns=['target'])
y = df['target']
X_train, X_test, y_train, y_test = train_test_split(X_leaky, y, random_state=0, stratify=y)
clf = LogisticRegression(max_iter=1000).fit(X_train, y_train)
print("Test accuracy with leakage:", clf.score(X_test, y_test))
|
现在,为了比较在不包含“泄露特征”的测试集上的准确率结果,我们将移除该特征并重新训练模型:
|
1
2
3
4
5
|
# Removing leaky feature and repeating the process
X_clean = df.drop(columns=['target', 'leaky_feature'])
X_train, X_test, y_train, y_test = train_test_split(X_clean, y, random_state=0, stratify=y)
clf = LogisticRegression(max_iter=1000).fit(X_train, y_train)
print("Test accuracy without leakage:", clf.score(X_test, y_test))
|
您可能会得到类似这样的结果:
|
1
2
|
Test accuracy with leakage: 0.8288288288288288
Test accuracy without leakage: 0.7477477477477478
|
这让我们不禁要问:正如文章标题所暗示的,数据泄露不是应该破坏我们的模型吗? 事实上,它确实会,这也是数据泄露难以察觉的原因,直到可能为时已晚:如引言所述,这个问题通常表现为训练和验证/测试集上的准确率虚高,性能的衰退只有在模型接触到新的、真实世界的数据时才会显现出来。预防它的策略理想情况下应结合多种步骤,例如仔细分析目标与其余特征之间的相关性,检查新训练模型中的特征权重,看看是否有任何特征具有过大的权重,等等。
场景2:训练-测试集污染
另一个非常常见的数据泄露场景通常源于我们没有按正确的顺序准备数据,因为是的,数据准备和预处理的顺序很重要。具体来说,在将数据分割成训练集和测试/验证集之前对数据进行缩放,可能会因为用于缩放的统计数据而意外地(且非常微妙地)将测试数据的信息纳入训练过程中。
这些基于流行的葡萄酒数据集的快速代码片段展示了应用缩放和分割的错误与正确方法(正如您将注意到的,这是顺序问题!):
|
1
2
3
4
5
6
7
8
9
10
11
12
13
14
15
16
|
import pandas as pd
from sklearn.datasets import load_wine
from sklearn.model_selection import train_test_split
from sklearn.preprocessing import StandardScaler
from sklearn.linear_model import LogisticRegression
X, y = load_wine(return_X_y=True, as_frame=True)
# WRONG: scaling the full dataset before splitting may cause leakage
scaler = StandardScaler().fit(X)
X_scaled = scaler.transform(X)
X_train, X_test, y_train, y_test = train_test_split(X_scaled, y, test_size=0.3, random_state=42, stratify=y)
clf = LogisticRegression(max_iter=2000).fit(X_train, y_train)
print("Accuracy with leakage:", clf.score(X_test, y_test))
|
正确的方法:
|
1
2
3
4
5
6
7
8
|
X_train, X_test, y_train, y_test = train_test_split(X, y, test_size=0.3, random_state=42, stratify=y)
scaler = StandardScaler().fit(X_train) # the scaler only "learns" from training data...
X_train_scaled = scaler.transform(X_train)
X_test_scaled = scaler.transform(X_test) # ... but, of course, it is applied to both partitions
clf = LogisticRegression(max_iter=2000).fit(X_train_scaled, y_train)
print("Accuracy without leakage:", clf.score(X_test_scaled, y_test))
|
根据具体问题和数据集的不同,应用正确或错误的方法可能只会产生很小的差异,因为有时测试集泄露的信息在统计上可能与训练集中的信息非常相似。不要在所有数据集中都认为这是理所当然的,作为良好的实践,请始终在缩放之前进行分割。
场景3:时间序列数据中的时间泄露
最后一个泄露场景固有于时间序列数据,它发生在未来信息——即模型需要预测的信息——以某种方式泄露到训练集中的情况。例如,在使用未来值预测过去值(如股票价格场景)来构建预测模型并不是正确的方法。
此示例考虑了一个合成生成的每日股票价格小数据集,我们故意添加了一个新的预测变量,该变量泄露了模型在训练时本不应知晓的未来信息。同样,我们在这里是故意这样做的以说明问题,但在现实世界的场景中,由于意外的特征工程过程等因素,这种情况并不少见:
|
1
2
3
4
5
6
7
8
9
10
11
12
13
14
15
16
17
18
19
20
21
22
23
24
25
26
27
28
29
30
31
32
|
import pandas as pd
import numpy as np
from sklearn.linear_model import LogisticRegression
np.random.seed(0)
dates = pd.date_range("2020-01-01", periods=300)
# Synthetic data generation with some patterns to introduce temporal predictability
trend = np.linspace(100, 150, 300)
seasonality = 5 * np.sin(np.linspace(0, 10*np.pi, 300))
# Autocorrelated small noise: previous day data partly influences next day
noise = np.random.randn(300) * 0.5
for i in range(1, 300):
noise[i] += 0.7 * noise[i-1]
prices = trend + seasonality + noise
df = pd.DataFrame({"date": dates, "price": prices})
# WRONG CASE: introducing leaky feature (next-day price)
df['future_price'] = df['price'].shift(-1)
df = df.dropna(subset=['future_price'])
X_leaky = df[['price', 'future_price']]
y = (df['future_price'] > df['price']).astype(int)
X_train, X_test = X_leaky.iloc[:250], X_leaky.iloc[250:]
y_train, y_test = y.iloc[:250], y.iloc[250:]
clf = LogisticRegression(max_iter=500)
clf.fit(X_train, y_train)
print("Accuracy with leakage:", clf.score(X_test, y_test))
|
如果我们想用新颖的、有意义的特征来丰富我们的时间序列数据集以实现更好的预测,正确的方法是引入描述过去的信息,而不是未来。滚动统计数据是一个很好的方法,如本例所示,它还将预测任务重新表述为分类而不是数值预测:
|
1
2
3
4
5
6
7
8
9
10
11
12
13
14
15
16
17
18
19
20
21
22
23
24
25
26
27
28
29
30
31
32
|
import pandas as pd
import numpy as np
from sklearn.linear_model import LogisticRegression
np.random.seed(0)
dates = pd.date_range("2020-01-01", periods=300)
# Synthetic data generation with some patterns to introduce temporal predictability
trend = np.linspace(100, 150, 300)
seasonality = 5 * np.sin(np.linspace(0, 10*np.pi, 300))
# Autocorrelated small noise: previous day data partly influences next day
noise = np.random.randn(300) * 0.5
for i in range(1, 300):
noise[i] += 0.7 * noise[i-1]
prices = trend + seasonality + noise
df = pd.DataFrame({"date": dates, "price": prices})
# WRONG CASE: introducing leaky feature (next-day price)
df['future_price'] = df['price'].shift(-1)
df = df.dropna(subset=['future_price'])
X_leaky = df[['price', 'future_price']]
y = (df['future_price'] > df['price']).astype(int)
X_train, X_test = X_leaky.iloc[:250], X_leaky.iloc[250:]
y_train, y_test = y.iloc[:250], y.iloc[250:]
clf = LogisticRegression(max_iter=500)
clf.fit(X_train, y_train)
print("Accuracy with leakage:", clf.score(X_test, y_test))
|
🚀 想要体验更好更全面的AI调用?
欢迎使用青云聚合API,约为官网价格的十分之一,支持300+全球最新模型,以及全球各种生图生视频模型,无需翻墙高速稳定,文档丰富,小白也可以简单操作。
评论区